
GUIDE 2: Getting To Know The Facebook Ads Manager
- ss bo

- Sep 23, 2020
- 8 min read
In this guide, you will learn how the Facebook Ads Manager works. I will walk you through the different sections and I will also include screenshots to make it easier for you to find your way around the Ads Manager.

What Is The Facebook Ads Manager?
The Facebook Ads Manager is your ad campaign command center for all your Facebook ads, Instagram ads, or Audience Network ads. It is where you go to create new ads, edit and manage your existing ads, view your ad reports, manage your Facebook pixel events, your billing info, and so much more.
In addition to accessing your Ads Manager on a desktop computer, you can also access your ads using the official Facebook Ads Manager mobile app. You can download this on both Google Play Store and the Apple App Store for free. The mobile app allows you to:
Create new ads Track your ads performance
Edit and manage current ads
Edit ad budgets and schedules
Receive push notifications
It’s important to mention here that with Ads Manager, you can only manage 1 ad account. If you want to manage more than 1 ad account, you will need to create a Facebook Business Manager account. So if you have clients or you need to keep your ad accounts separate (like one ad account for each business), then you need the Facebook Business Manager.
How To Access The Facebook Ads Manager
Accessing the Facebook Ads Manager is quite simple. Here’s how:
Step 1. Log in to your Facebook account.
Step 2. On the blue top navigation bar, you can you can see the white triangular arrow. Click on this arrow and then click Create Ads (see image below).

(How to access the Ads Manager from your Facebook account)
Step 3. Facebook will set up your Ads Manager. You will see this on your screen while you wait (don’t worry it won’t take more than a few seconds).

(Your Facebook Ads Manager set up screen)
Step 4. When Facebook is finished setting up your Ads Manager, your screen will show something like this:

(Your Facebook Ads Manager home screen)
Now that you know how to access the Facebook Ads Manager, let me show you how you can create your first Facebook ad.
How To Create An Advert On The Facebook Ads Manager
When you’re ready to create an ad, simply follow the steps I’ve outlined in the previous section to access the Facebook Ads Manager. In the Ads Manager, you have to go through 3 different levels – the campaign level, the ad set level, and the ad level.
Level 1 - Campaign Level
In Guide 1, I mentioned you should have a goal in mind before you set up your Facebook ads. When choosing from any of 11 objectives below, keep your goal in mind and choose the most suitable objective from the list:
1. Brand awareness
2. Reach
3. Traffic
4. Engagement
5. App installs
6. Video views
7. Lead generation
8. Messages
9. Conversions
10. Catalog sales
11. Store visits
Once you’ve chosen your marketing objective, your Campaign name will be your objective. In this example, I selected the Traffic objective, therefore, my Campaign name is Traffic. You can edit the Campaign name as you see fit.

(The default Campaign name is the marketing objective you’ve chosen)
As you can see near the bottom of the screenshot above, you can edit your budget at the Campaign level.
When you’re ready to proceed, click on the the blue Set up ad account button. You will then be directed to this page:

(Set up your ad account in the Facebook Ads Manager)
Setting up your ad account is very straightforward. Simply select your country from the list, then your currency, and lastly, your time zone. Click Continue. Now we go to the second level.
Level 2 – Ad Set Level
In the Ad Set level, the options that will appear will depend on your chosen objective. If you want, you can always go back to the Campaign level and change the objective so you can see the different options. But the three options that are present in the Ad Set level of ALL campaigns are the following:
Audience
Placements
Budget & schedule
For this guide, I am using Traffic as my campaign objective. These are the options available for Traffic campaigns at the Ad Set level:

(The options available at the Ad Set level for Traffic campaigns)
At this point, you should fill out the different sections with information relevant to your specific campaign. If you’re using a Traffic campaign like I’m doing in this example, here’s more information on the different settings you need to define at the Ad Set level:
Traffic – choose whether you want people to go to your website, your app, or to send you a message on Messenger
Offer – if you’re running a promotion in your business, you can create an offer that people can save and receive reminders about.
Audience – this is where you define who you want to show your ads to. You can either create a new audience, use a saved audience, or create a custom audience composed of people who have interacted with your business either online or offline.
Placements – you can choose to have Facebook decide the placements automatically or choose yourself manually. It’s best to choose manual placements so you can decide whether you want to show your ads on desktop, mobile, right column, Instagram, Audience Network, or Messenger. Manual placement gives you control over your ads.
Budget and schedule – in this section, you can decide whether you want to use a daily budget or a lifetime budget. Facebook will give you an estimate of your total weekly spend.
Level 3 – Ad Level
The options you see at the Ad level will depend on your Campaign objective.
If you choose Brand Awareness as your objective, you will see different options at the Ad Level.
If you choose Conversions, you will see a different set of options.
Since we chose Traffic as our ad objective in this guide, these are the options available at the Ad level:

(The options available at the Ad level for Traffic campaigns)
At the Ad level for Traffic campaigns, you will need to specify the following details:
Identity – choose your Facebook page or Instagram account
Format – choose how you want your ad to look. As you can see in the screenshot, you can choose from Carousel, Single Image, Single Video, Slideshow or Collection ad formats. If you chose mobile placements at the Ad Set level, you could even add a full-screen landing page for your ad for a more immersive experience for those who engaged with your ad.
Links – this is where you write down the text, images or videos for your ad. You can also view your ad preview here so you can see what your ad looks like based on the placements you chose at the Ad Set level.
You can play around with the different settings until you’re happy with how your advert looks like. When you’re ready to publish, hit the green Confirm button.

(Click Confirm when you’re ready to place your order)
A Quick Tour Of All Tools On The Facebook Ads Manager
To access all the tools on your Ads Manager, click on Ads Manager at the top left corner. You will then see the Ads Manager Menu as you see below. If you don’t see the same image, make sure you click on All Tools at the bottom:

(The Ads Manager Menu)
As you can see in the screenshot, the Ads Manager menu is divided into six columns.
1. Frequently Used column – this column contains a link to 4 of your most frequently used tools in the Ads Manager
2. Plan column–in this column you can access Audience Insights and Creative Hub
Audience Insights – this is where you create hyper-targeted audiences. Facebook gives you a lot of data to play with, and you can target people based on their location, interests, and behaviors.
Creative Hub – if you’re not ready to pay for real ads, but you want to see how it would look like to your audience, simply go to Creative Hub and create mockups for your ads. This is also where you can check the percentage of text in images you’re going to use in your ads. If there’s too much text on your image, your advert’s reach may be affected.
3. Create & Manage column –in this column, you have access to 6 different tools, such as:
Business Manager – this is simply a link to the Facebook Business Manager where you can manage multiple ad accounts in one place
Ads Manager– this is where you create your Facebook ads (I already gave an overview of how to create ads in the previous section of this guide)
Power Editor–in the Power Editor, you can import and export ads as well as bulk-edit your work
Page posts – you can create new posts here. You can also create posts by going to your page. In this menu, you can choose whether to use your newly created post as an ad or have it published to your page as well.
App dashboard – if you are a Facebook app developer, you can create and manage settings for your apps in your app dashboard
Automated rules–with automated rules, you have more control over your hands. You no longer need to check your campaigns daily. You can just set up automated rules that will notify or update you when there are changes in your campaigns, ad sets, or ads.
4. Measure & Report column–in this column, you can track and measure your ads and your events. The tools in this column are:
Ads Reporting – you can create and export reports in Ads Manager to see your most important ad metrics. You can also schedule reports to be emailed to you directly.
Analytics – this tool will help you analyze data from your Facebook pages as well as the pixel installed on your website
Events Manager – this tool allows you to create and manage your Facebook pixel, offline events, app events, add custom conversions and partner integrations.
5. Assets column–in this section, you have easy access to important assets that you have used or will be using to create your ads, these include:
Audiences – this tool will help you create and manage custom audiences, lookalike audiences, and saved audiences
Images – this tool will allow you to upload and manage images for your pages and ads
Catalogs– if you have a store with many products, you can add and manage your inventory here
6. Settings column - you can access three tools in this column. These are:
Settings – you can access your ad account settings here, your pages, your payment settings, and your email and Facebook notifications.
Business settings – if you have Business Manager setup, this is where you manage your ad accounts, pages, and the people who work on them.
Billing – you can manage your payment settings here, and you can see all the billing transactions that have ever occurred in your ad account
Need Help Navigating Your Facebook Ads Manager?
If you’re afraid of getting lost in the Ads Manager maze, don’t be. If you need help with anything, you can simply type your query on the search bar.
Alternatively, you can also click on the Help button in the upper right corner of your screen, and the Advertiser Help Center will appear on your screen.
Here’s where you find these useful tools:
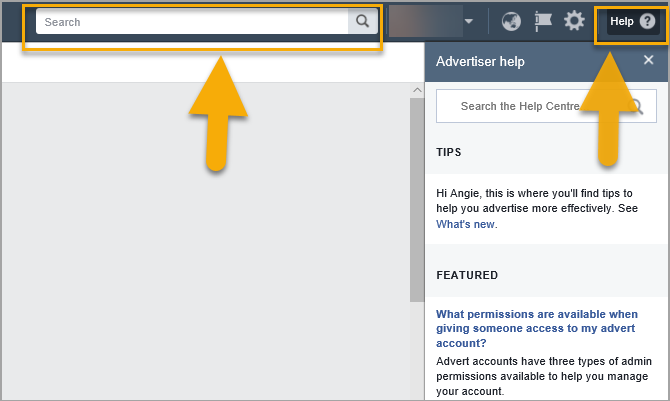
(Use the search bar and the Help Center if you need help with the Ads Manager)
Final Words
I hope this guide has helped you get to know more about the Facebook Ads Manager and how you can get started creating your first Facebook advert. In the next guide, I will discuss and compare Facebook Ads with Boosted Posts. See you there!
NEXT POST !!! COMMING SOON....
Facebook Ads vs. Boosted Posts
In the first two guides of this Facebook Ads Domination series, I discussed Facebook Ads and the Facebook Ads Manager in great detail. I talked about how and why you should get started with Facebook Ads. There are so many benefits to creating an ad using the Ads Manager.

Comments